A site for my handmade cards, accompanied by my photos and written meanderings which are occasionally witty, often tongue-in-cheek, and rarely profound. Beginning in June 2013, you'll also see lots of NBUS, which is an acronym I coined for Never-Before-Used-Schtuff. Note: my Privacy Policy can be found at a tab below and you can find my NBUS Challenge online. I hope you'll join in the fun there! Thanks for coming by! Have a beverage and enjoy!

June 22, 2022

Today Is a Good Day!

Hello Stamplings!

I know, I'm back pretty quickly, but before they close, I want to support a few challenges with a QACAS OLC (quick and clean and simple one-layer card).

But first, sorry, it was rude of me not to ask how you're doing? The Heat Dome over the US and parts of Europe is like something out of a science fiction movie. Since we can't escape it, then we just have to decide that today is a good day to have a good day!
Peeking from the side of my card is a portion of a NBUS flower stamp from Craft Emotions. It doesn't say on the packaging, but I think they are magnolia flowers. I've done the direct-to-stamp inking and spritzing technique in Ukranian blue and yellow colors. The sediment is unmarked. After I touched up the image with my Ziggies and colored pencils, I ran the card through my Gemini using the SU Subtle e/f. I love how the sun lit the texture so it looks like the background is made of stucco.

Challenges
~~~

No Twofer today, but I'll leave you with a couple of eggcorns. I haven't shared any in a long time:
  • escape goat, instead of scape goat.
  • hearbuds, instead of ear buds.
  • plate mats, instead of place mats.
  • radar detester, instead of radar detector.
  • real goal-getter, instead of real go-getter.
  • very close veins, instead of varicose veins.
You gotta love 'em. Seems like every family has one or two. Does yours? You prolly remember my family favorite was my Aunt Alzada's: "hard roll to hold," instead of "hard row to hoe."😂

~~~

Enjoy your day! No, seriously, enjoy! LITS!*

As always, thank you for coming by to visit the Playhouse, being a follower, and leaving some love!

*Life is too short!

To open the pop-up comment box that let's you jump to the end w/o scrollingClick CTL + Home. Click the Home tab under my blog banner which resets the post. Click Page Down to reach the end of the post. Click Comments and a pop-up box opens. Click "Jump to Comment Form" and wallah, no more car pool tunnel! Mwah! (p.s. If you ask me a question in your comment, please remember to leave me your email address so I can respond. Thank you!)

June 19, 2022

The C Word

Hello Stamplings!

I hope you are chugging along well! Happy Father's Day to all the dads out there and the moms who play the role of both mom and dad! And special hugs to all of you who miss your dads.

The C word in my title is not Cancer or Covid, it's Christmas! Yes, I know, some of you are backing away in horror. Not me. I learned my lesson the hard way, which is, if I don't have a good start by now (😱July 1st is just around the corner), then it's an uphill climb to get them finished. 

And, guess what, I don't have a good start by now, so I made two. They are both QACAS, so why didn't I make more of them? She asks with a slap.

Onefer
CAS Christmas is back (pause for applause) and Linda has chosen Wreath for the prompt. I wanted to also use my entry as a reminder about CAS Mix Up Challenge where I am this month's guest designer. Lolly wants us to use pastes or gels, but I don't have any wreath stencils. Hmmm.

So ... what I did was, I covered over parts of a NBUS Gina K. "Fizzy" stencil (which was a gift from a friend😙) with two solid circle shapes, so that I could apply Cosmic Shimmer Sparkle Texture Paste (which was a gift from a different friend😙) in the uncovered holes so in the form of a wreath. I'll wait a minute while you go over that again and create a video in your head. It's for your own good. If I made you a video, you wouldn't get this brain exercise.

I didn't capture the schparkle very well in the photo, but it's very shiny and glittery irl. I used glossy red c/s for the mat, the PTI bow, and the sediment.

It's different, but it's kinda growing on me. I debated with Hammy about drawing circles around the wreath or shading it to add more definition, but he liked it free and breezy. Well, sure. Free and breezy is a natural state for him.

Other Challenges

Twofer
I thought maybe this sunburst stencil could work as a wreath, but maybe that's taking artsy too far. So, okay, I will just use it as another reminder to you that the June CAS Mix Up Challenge is still going on and we'd love to see your clean and simple cards using pastes or gels!

I will add this to the Blue and Green color challenge over at Color Hues and the Add a Sentiment challenge at Simon Says Stamp Wednesday.
RIP Verna
Verna 1924 - 2022

It is with a mixture of sadness and relief that I let you know my friend Verna passed away. Thank you to all of you who so kindly sent her cards these last few years. She always told me when she got a new one and she'd always say, "How talented your friends are!" She loved each and every card. Mwah!
And she loved seeing Nellie through the porch window when we would visit. I wanted to share this photo with you before I forget. I couldn't believe I caught the shot ~ it looks like she is smelling the flowers!

Enjoy your day! No, seriously, enjoy! LITS!* I hope you get a chance to smell the flowers and, as always, thank you for coming by to visit the Playhouse! 

*Life is too short!

To open the pop-up comment box that let's you jump to the end w/o scrollingClick CTL + Home. Click the Home tab under my blog banner which resets the post. Click Page Down to reach the end of the post. Click Comments and a pop-up box opens. Click "Jump to Comment Form" and wallah, no more car pool tunnel! Mwah! (p.s. If you ask me a question in your comment, please remember to leave me your email address so I can respond. Thank you!)

June 12, 2022

Pouncing Powder and Fun With Friends!

Hello Stamplings!

I hope you are doing well and enjoying the last few days of spring! (Although for some of us, the furnace blast of red hot temperatures would have you believing it is the middle of summer!😝)

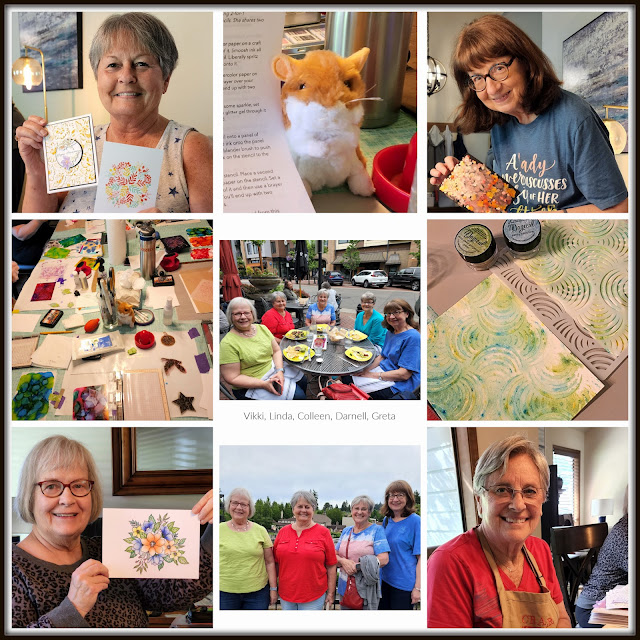
Speaking of blast, I'm just back from a fun crafty retreat with some friends last week. It's my first trip anywhere since 2019 and it felt wonderful to get away! It was also exciting to try out different techniques ~ always more delightful with a group of friends! 

Onefer
One of the techniques we tried was from a video I stumbled across while on You Tube. It was a Marion Emberson Mini-Masterclass video showing the embossed pouncing technique. It was a hoot watching her experiment and I had to give it a try. Some of you may have already "been there, done that," but it was new to me.

I have to say, it took a bit of trial and error, but I didn't really have any failures because all the results were cool in their own way. I did find that some of the brands of e/p (embossing powder) worked better than others. Also, as Marion says, make sure you keep the heat gun moving so it doesn't overheat!

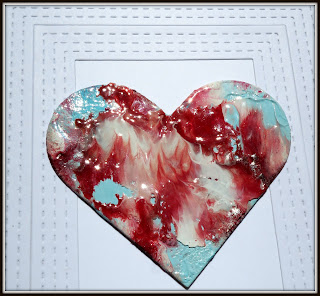
If you place your piles of e/p between two sheets of parchment, you get "skins" that you can attach to a card front. Or you can put the piles of e/p directly on a chipboard image, cover it with parchment, and then pounce it with the heat gun. I liked the chipboard way the best. But either way, when you pull and lift the parchment away, you get that cool "flame" effect.

For this card I did both. First I made a skin and set it aside. Then I piled and pounced the same colors of e/p onto a chipboard heart and that looked great. And then, just for the heckofit, I attached the skin over the top of the heart! Here's a closeup:
The skins are pretty fragile and can be 'holey' depending on how much powder you lay down, but it does adhere well to a card front if you put enough pinpoints of glue on the back. The e/p I used was WOW and the stitched frame is from Reverse Confetti.

So then what happened was, ala Marion, I thought the mess that was left behind (after I removed the heart from the piece of cardstock) would also make a ... well, what would say? Artsy card? The love die is from Winnie & Walter sprinkled with e/p to match and heat-embossed. It's very glossy and schparkly in real life.
And here are a few more below. For the first one, I used a NBUS flower die from my friend Bozena which I cut from heavy cardboard. I haven't made the results in the middle into cards yet.
~~~

Oregon Retreat 2022
ColleenGretaLinda, and Vikki. And Hammy came, too, of course!
More technique playtime results to follow. 
Thank you, my friends, for a fantastic time in your beautiful state!

~~~

Enjoy your day! No, seriously, enjoy! LITS!*

As always, thank you for coming by to visit the Playhouse! Please let me know you came by!

*Life is too short!

To open the pop-up comment box that let's you jump to the end w/o scrollingClick CTL + Home. Click the Home tab under my blog banner which resets the post. Click Page Down to reach the end of the post. Click Comments and a pop-up box opens. Click "Jump to Comment Form" and wallah, no more car pool tunnel! Mwah! (p.s. If you ask me a question in your comment, please remember to leave me your email address so I can respond. Thank you!)

June 1, 2022

NBUS Flower and CAS Mix Up Guest Designer

Hello Stamplings!

I hope you are doing well as we start this first day of June! Of note, today is National Pen Pal day! (You see what I did there?) Thanks to this wonderful blogging community of cardmakers, I'd like to thank all of the 200+ amazing pen pals friends who exchange awesome handmade cards with me!

The sales were insanely tempting this past weekend. Did you cave in? It was hard to resist and if you didn't resist, I hope you got everything you wanted!  

Due to a win in Febrooary, this month it is my pleasure to be the Guest Designer for CAS Mix Up!! CAS Mix Up has been on hiatus and it is wonderful to have the challenge open again! CAS Mix Up has a rotation of themes and for June the theme is "Stencils." In addition to a theme, there is a prompt for you to follow and the prompt for June is "Pastes/Gels." 

Here is my card to inspire you:
I have to tell you that when Jenny told me the theme was "stencils," I was glad because I purchased quite a few of them over the last coupla years and I even made up cool binders for them ... and then I pretty much ignored them. This was just the kick in the pants I needed to stencil again.

But then when she went on to tell me I needed to use a stencil AND embossing paste or gel, I literally gulped. Just like they do in novels.

Now what do I do? Embossing pastes and gels are another thing I got into for five minutes five years ago and then pretty much ignored. But, okay. I can do this. They wouldn't call it a challenge if it weren't challenging. And you know what? I ended up having the best time making my card. Forgive me for tooting my own honker, but I love how it turned out!

What happened first was, I blended CP Aquatini onto a white card through the NBUS round flower stencil from Funky Fossil.
Next, I applied the gel medium through the stencil. I hope you can see in some of the photos the wonderful silky "feel" that happens when the gel hardens. It is translucent, so the pretty aqua color remained.
Next I used a Poppystamps Pointed Rectangle Die to cut a frame to go around the circle. Because this is a CAS challenge, the card design needs to be clean and simple. That means lots of white space, so I cut the circle in half and made two cards. (I temporarily taped the circle back together on the back in order to take the photos for this post.)

So I held my half-circle up this way and that on my card and I finally decided to use it as a faux flap on a colored card panel. I know, I'm with you on wishing it opened up as a tri-fold, but it never even occurred to me until I saw it finished. To bring the eye in and make the design consistent, I added a matching pierced frame as a border. 

Now. What to do about a sediment? I was looking through my various word dies, when my little hamster helper challenged me to add another stencil element to really inspire everyone! Well, that was a cracklin good idea, but I don't have any word stencils ...
... so I just made one using a Hugs die from MFT! Shazambam! I used Dreamweaver Pearlescent Embossing Paste through the homemade stencil and it really worked a shiny treat. 
It's an honor to join the extremely talented group of designers at CAS Mix Up for June and I encourage you to check out their cards for lots of great design ideas ~ then get your stencil groove on using embossing paste or gel and join the gallery! If I can do it, you can do it, and I can't wait to see what you make!

Twofer
Real quick, here is another card that I made a while ago for a dear friend. I love this little mum-like stencil flower, but it's unmarked so I can't help you there. I do wish all stencil manufacturers would etch their names on their stencils. I used Gina K. Glitter Gel mixed with some Opal Magic (pink-blue) acrylic paint. The amazing sediment is from "Unforgettable" by WPlus9. Here's a closeup of the schparkle:
Challenges
~~~

Enjoy your day! No, seriously, enjoy! LITS!*

I'm excited that I'm going to be seeing some crafty friends over the next few days and, after that, enjoying some non-crafty time with another dear longtime friend! Pray for us that Covid leaves us alone to have some long-awaited time together. Mwah!

*Life is too short!

To open the pop-up comment box that let's you jump to the end w/o scrollingClick CTL + Home. Click the Home tab under my blog banner which resets the post. Click Page Down to reach the end of the post. Click Comments and a pop-up box opens. Click "Jump to Comment Form" and wallah, no more car pool tunnel! Mwah! (p.s. If you ask me a question in your comment, please remember to leave me your email address so I can respond. Thank you!)