A site for my handmade cards, accompanied by my photos and written meanderings which are occasionally witty, often tongue-in-cheek, and rarely profound. Beginning in June 2013, you'll also see lots of NBUS, which is an acronym I coined for Never-Before-Used-Schtuff. Note: my Privacy Policy can be found at a tab below and you can find my NBUS Challenge online. I hope you'll join in the fun there! Thanks for coming by! Have a beverage and enjoy!

January 28, 2023

Creative Heat Embossing

Hello Stamplings!

Don't look now, but we are almost at the end of the first month of 2023! Didn't we just put up our new calendars?! This whooshing is getting so out of hand that I've ordered an extra seat belt for my office chair!

Speaking of blasts, I had a blast making today's twofer ~ and several more! At our last Zoom session, we tried a technique called, "Creative Heat Embossing." It's a technique I've seen in the past and have been wanting to try. In brief, you use creative ways to apply Versamark to a background panel and then you emboss the panel using one or more colors of embossing powder.

Onefer
For this background, I used a crumpled paper towel to pounce Versamark randomly on my red panel and then I heat-embossed it in gold. (The red panel, not the crumpled paper towel.) You can also use crumpled plastic wrap for a similar look. I finished the card using poppystamps, "Feather Tree Frame" and a NBUS hugs and kisses die from Penny Black called, "Filled With Love."
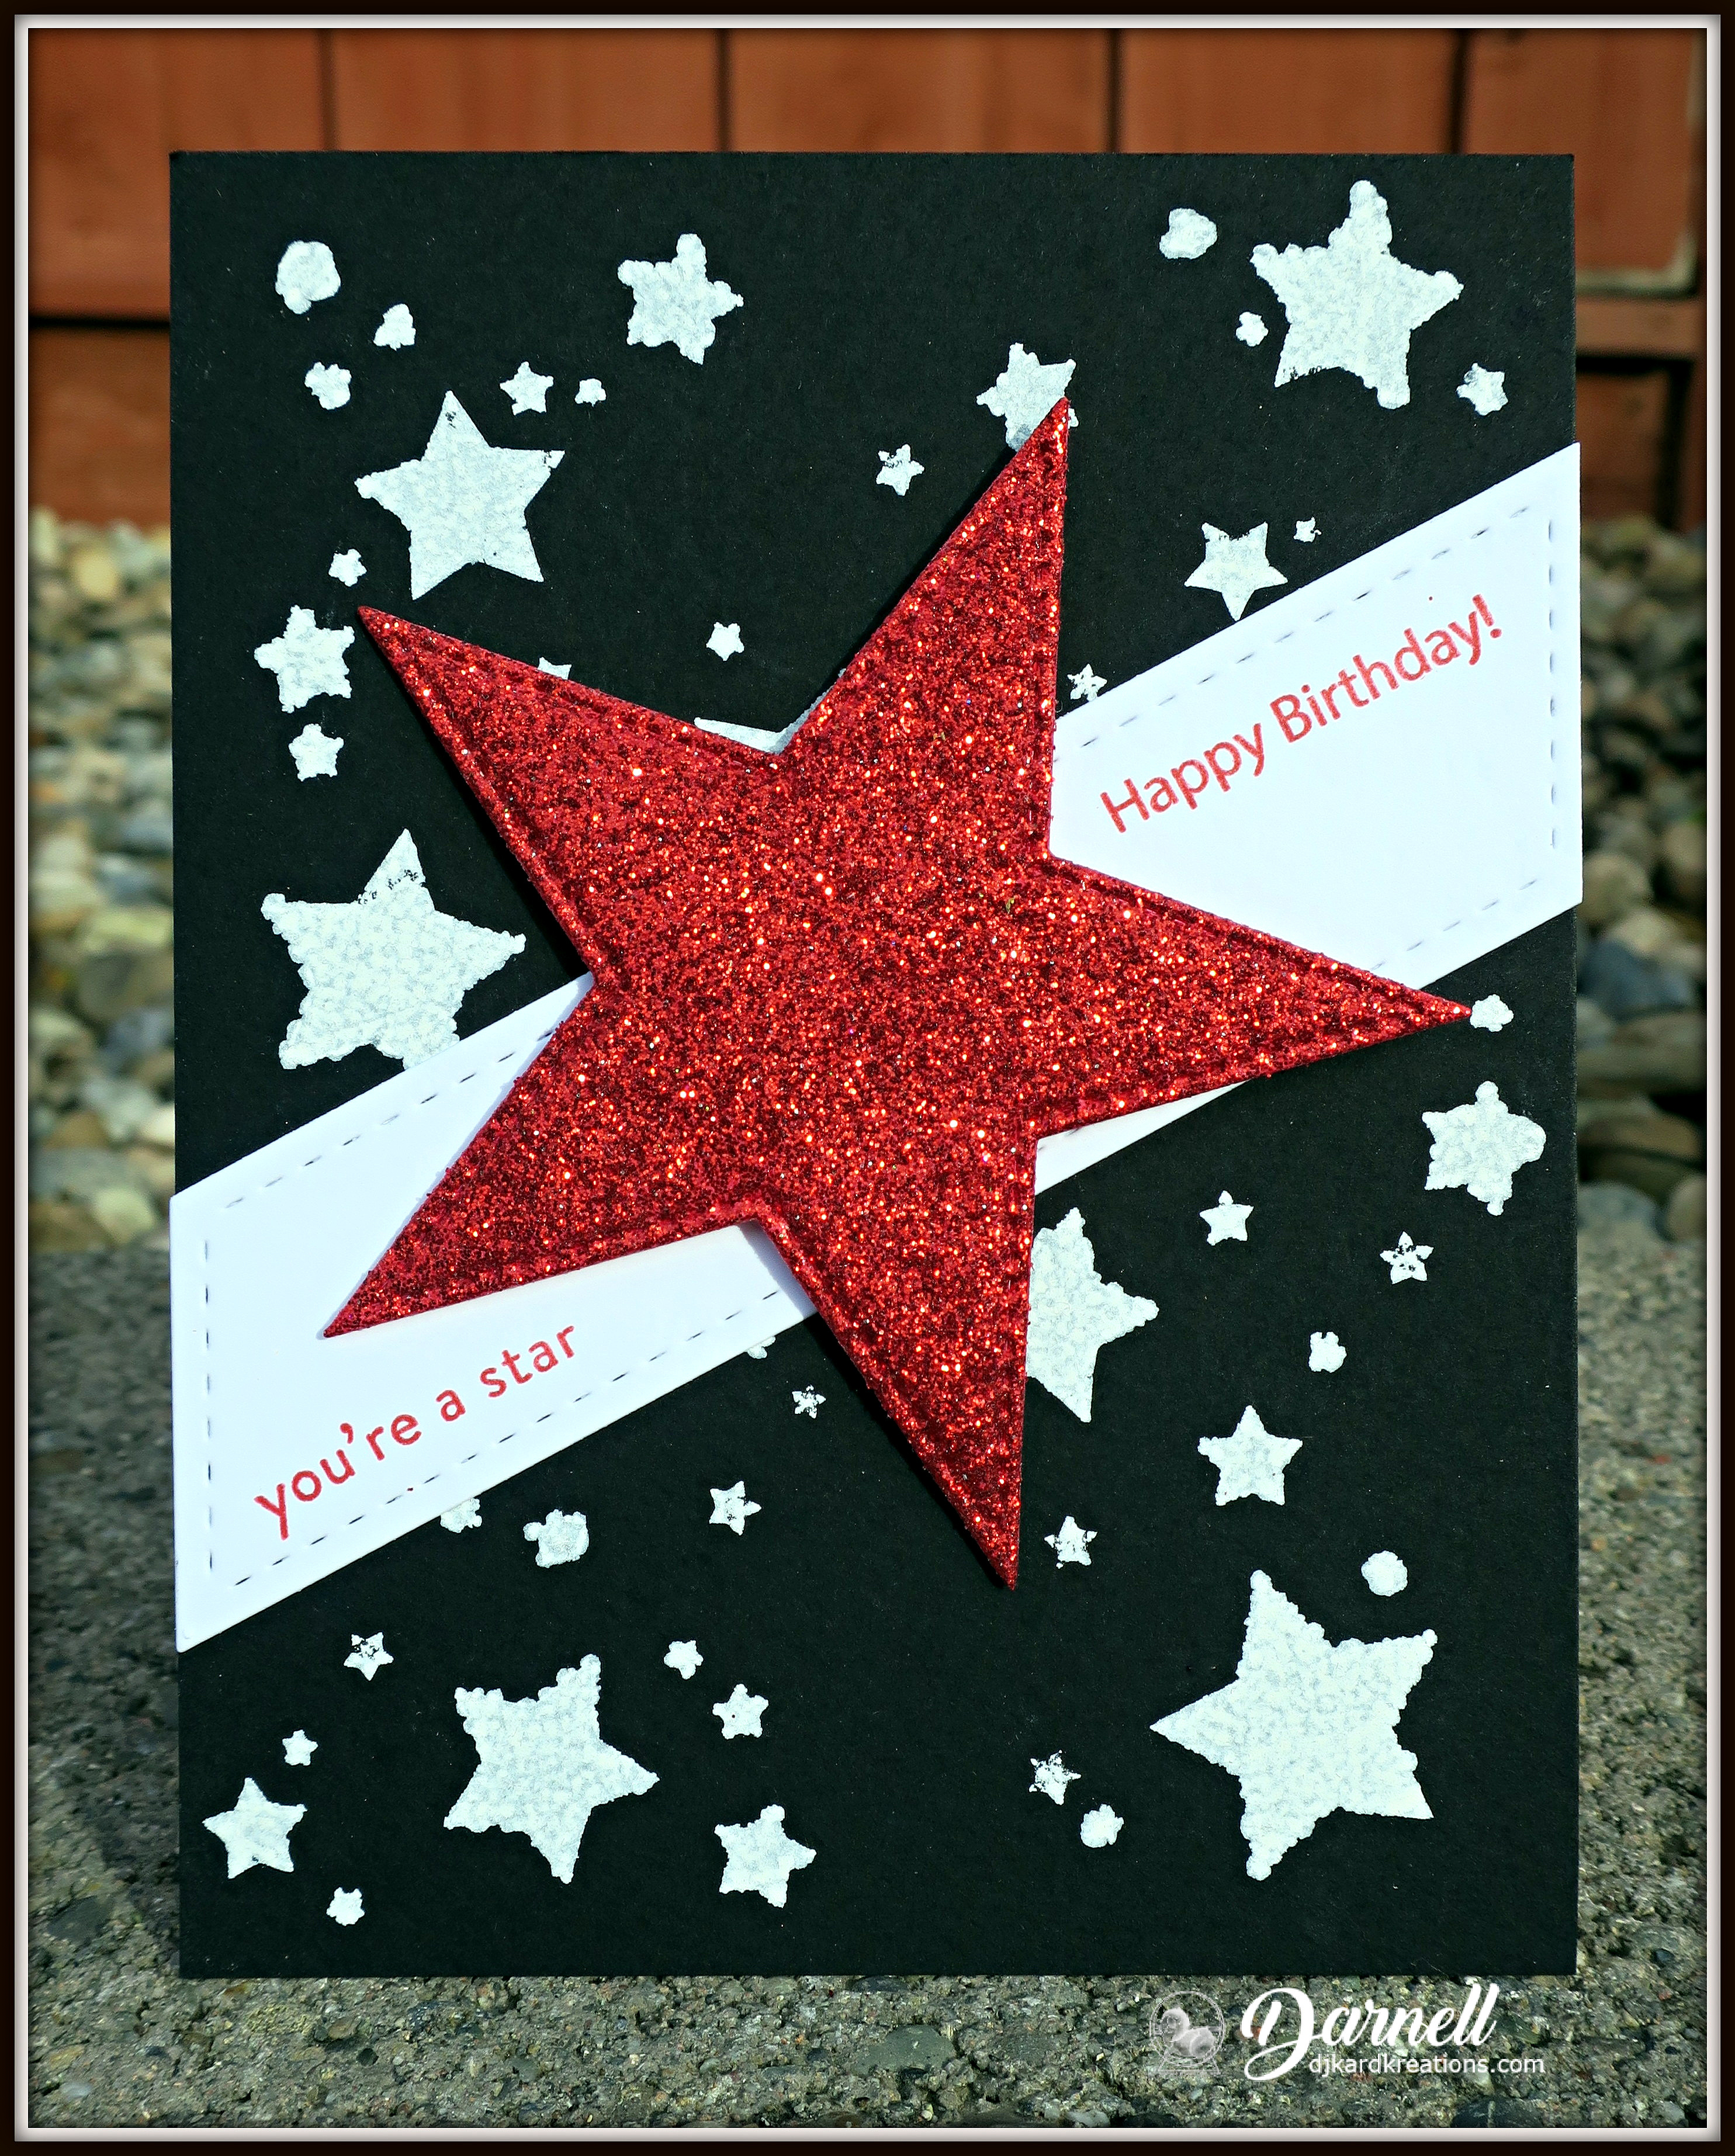
Challenges
Twofer
For this Christmas card, I also used a crumpled paper towel, but this time Hammy lined up gold, silver, platinum, and copper embossing powders for me to use one-by-one and I love how it turned out! I added a simple sediment banner for the Creative Expressions sediment and a bit of bling. I'll be linking this card to the Rudolph Days challenge.

~~~

As you can see below, Hammy and I became addicted to trying different delivery methods and different colors of e/p. We loved the randomness of the pouncing and then the glimmery-shimmery reveal as the heat gun melted the powder. In addition to using crumpled paper towels, I used a small square Versamark pad direct to the panel, an old steel-wool pad, and daubers of various sizes and shapes:
And here are some of my other finished designs:
The colors and shimmer are hard to capture, but you get the idea. I want to try more combinations like the middle right card. The different embossed powders are gorgeous on black or colored card. (That get-well design in the lower right came about because I used a large oblong dauber to ponce ... we all agreed the embossed results looked like band-aids!😁)

* * *
During the pandemic I've been fortunate to meet monthly via Zoom with crafty friends and I've loved trying out various new-to-me techniques and ideas. Many of our sessions have been led by the very talented Loll Thompson. Each month Loll generously provides samples and worksheets for us.

And now we are delighted to let you know that Loll has designed a new blog which allows all of you to reap the benefits of our sessions, both past and future! Thank you, Lolly! 

The name of the new blog is Group of Seven Cardmakers
Each month there will be a new technique featured and Loll has filled the side-bar with loads of information and advice from past sessions for you to enjoy. We hope the new blog (and our seven individual blogs) will schpark and inspire YOU to try some of the techniques that you've either never heard of or that have been on your "Try This" list for a long time! 💕

~~~

Enjoy your day! No, seriously, enjoy! LITS!*

As always, thank you for coming by to visit the Playhouse and special thanks to you if you take the time to join as a follower! Please let me know you came by so I can be sure and return the flavor!

*Life is too short!

To open the pop-up comment box that let's you jump to the end w/o scrollingClick CTL + Home. Click the Home tab under my blog banner which resets the post. Click Page Down to reach the end of the post. Click Comments and a pop-up box opens. Click "Jump to Comment Form" and wallah, no more car pool tunnel! Mwah! (p.s. If you ask me a question in your comment, please remember to leave me your email address so I can respond. Thank you!)

January 19, 2023

My ♥ Is a Flutter

Hello Stamplings!

How are you? We have sunshine! Everyone's disposition is going to soar after 22 days of rain and clouds! I hope Mother Nature is being kind to you, wherever you are!

Today I've got a coupla clean and simple cards.

Onefer
I've used a color challenge to inspire my Valentine. The image is called, "Bundle Girl with Falling Hearts" and it's by Stampingbella. The sediment is unmarked, but looks to be Paper Smooches. It doesn't show, but Hammy got to deploy one of his new winkers. After the coloring and winking, I ran the panel through my Gemini using the SU "Subtle" e/f. 

I know it looks like I've given her lilac hair, but the stamp package shows she has on a stocking cap to go along with her mittens and boots. It can be very cold in some parts on Valentine's Day, but a little cold never stopped romance. In fact, last Monday the Mister and I celebrated 52 years of wedded romance!🍻

Challenges

Twofer
Today's uber CAS Christmas card features a NBUS stencil from Tim Holtz called "Stampers Anonymous Woodland Stencil." I blended the ink through the stencil and then Hammy added SU Shimmery Crystal Effects to look like snow. It looks schparkly in person.

Challenges

~~~

I thought I'd share this quote as we start a new year. I'm an optimist and positive by nature, but sometimes the happenings in the world cause a lot of worry, which is stressful, which is not good. So, next to the Serenity Prayer, I love this.
Corrie Ten Boom
~~~

Enjoy your day! No, seriously, enjoy! LITS!*

As always, thank you for coming by to visit the Playhouse and special thanks to you if you take the time to join as a follower! Please let me know you came by so I can be sure and return the flavor!

*Life is too short!

To open the pop-up comment box that let's you jump to the end w/o scrollingClick CTL + Home. Click the Home tab under my blog banner which resets the post. Click Page Down to reach the end of the post. Click Comments and a pop-up box opens. Click "Jump to Comment Form" and wallah, no more car pool tunnel! Mwah! (p.s. If you ask me a question in your comment, please remember to leave me your email address so I can respond. Thank you!)

January 14, 2023

Oh My Starry Stars!

Hello Stamplings!

I hope you are dry and warm where you are! Sometimes I like to think of you snuggled on the couch with your laptop in your, um, lap! Or at your desk, or sitting in the car waiting to pick up the kids from school, or at the kitchen counter. Because my posts are bosumulous, I imagine you with a libation and a snack-a-doodle-do.

Onefer

(Still raining/cloudy here so my photos aren't as bright as usual.)
I used an unmarked starry stencil for this card and I pounced my white ink pad all over it, pushing the ink through the stars and onto a black base. 
I had a new juicy pad and it was fairly successful. Some stars ended up as dots, but Hammy says to tell you they are baby stars that haven't opened yet. Cool. I used my Lil Inkers Diagonal die as a star and sediment banner. The stitched star cut from glittery red paper is from MFT. Even though there is a glittery star, I'm thinking this design could be sent to any age or gender.

And now to my inspiration. I noticed that Shopping Our Stash has a fun challenge with the brief, "Pyjama Day!" I just had to play along because I treated myself to these black and starry new pjs just before Christmas:
I'm also linking to:


Twofer

As you can imagine, after I did the above pouncing, my stencil was pretty inky so when I picked it up, I immediately laid it on another piece of black card and pressed it down. When I lifted it off, I was left with this negative stencil image:
Being a good resolutionist, I turned it into a Christmas card for my second design:
I added a snowy hill for these old polar bears to play on, but I forgot to add schparkle to the hilltop because my little helper was napping.🐹

These old gals have been patiently residing in my Christmas Bits Binder for a very long time. They look like they are in a bit of shock to be out, don't they? It's my fault. Because they were in the dark for a very long time, I intended to put googly eyes on them to protect them. Of course I forgot, so now they are suffering from snow blindness. I'm told their eyes will gradually adjust to the brightness, but that walking bear is going to bump straight into that sediment and the red ink is gonna leave a stain. Oops.

Challenges

~~~

Enjoy your day! No, seriously, enjoy! LITS!*

As always, thank you for coming by to visit the Playhousebeing a follower, and leaving me some love! (So where is your favorite place to perch when you go visit your interweb friends?)
*Life is too short!

To open the pop-up comment box that let's you jump to the end w/o scrollingClick CTL + Home. Click the Home tab under my blog banner which resets the post. Click Page Down to reach the end of the post. Click Comments and a pop-up box opens. Click "Jump to Comment Form" and wallah, no more car pool tunnel! Mwah! (p.s. If you ask me a question in your comment, please remember to leave me your email address so I can respond. Thank you!)

January 8, 2023

It's a New Year!

Hello Stamplings!

Happy New Year! How has 2023 been for you as we finish out week one? Have you already broken any of your resolutions? That's okay, now you can just get on with life without pressure! 

We are starting our year off with a series of Bomb Cyclone/Atmospheric River events here in California. Some places have not seen rain like this for 150 years! The storms are lined up out in the Pacific until the 20th, possibly longer. As much as we desperately need the rain, it's not good to get so much at once. So far we are in no danger, but so many folks are not faring as well. 🙏

Between the weather confining me to quarters and the card challenges being on break, I enjoyed cleaning and purging. I know, I'm nuts to enjoy it, but if I don't do it, I get creatively clogged. (Aside: I find chocolate washed down with wodka also helps with clogs, but that's a different blog.😊)

Now we are lucky to have some of the challenges back to light our schparkle and Hammy brought back a whole case of brand-new winkers thanks to his generous relatives. So, away we go ~

Onefer
The NBUS star of the performance today is the "Serene Bird and Branch" die from Memory Box. For this CASual scene, she was cut from watercolor paper and painted with Ziggies in pink shades. With all the shiny gold from the frame and branch, we decided to just wink her tail feathers and use a simple sediment. 

Challenges


Twofer

Look away if you just can't bear looking at a Christmas card right now, lol!
This card is more layered. The snowflake circle cut from gold is a Hero Arts die called, "Snowflakes and Ornament." I cut off the ornament hanger to make it look like a wreath and then I nestled the Serene Bird cut from pp in amongst the snowflakes. (I don't think they are so cold when they are cut from gold.) 

I used Penny Black's "Red and Greens" holly die as wreath decorations and the NBUS sediment is from Simon's stamp set, "The Magic of Christmas," inked with CP's Juniper Mist.

Challenges


I've been posting Twofers now for years. By Christmas, I was up-to-here with even the thought of making Christmas cards, but I'm going to try and use the same stamp or die to make my Twofer a Christmas card during 2023. I'm slowing down and this past year I wasn't able to make as many Christmas cards as I needed.😒 The only way around that is to religiously make them all year like a lot of you are disciplined to do. I want to be like you. I always have good intentions, but then I get distracted by one bagful of squirrels or another! 

Plus, I'm hoping this plan will give Mr. Mojo a kick in the jo! Even a kick in the mo would be good, but that's gonna leave a bruise. Here are a few other Christmas designs I made using the Serene Bird. It got rather addicting once I got started and I have several more birds cut from pp to make even more. Whoop! 


~~~
 
Enjoy your day! No, seriously, enjoy! LITS!*
As always, thank you for coming by to visit the Playhousebeing a follower, and leaving me some love!

*Life is too short!

To open the pop-up comment box that let's you jump to the end w/o scrollingClick CTL + Home. Click the Home tab under my blog banner which resets the post. Click Page Down to reach the end of the post. Click Comments and a pop-up box opens. Click "Jump to Comment Form" and wallah, no more car pool tunnel! Mwah! (p.s. If you ask me a question in your comment, please remember to leave me your email address so I can respond. Thank you!)