A site for my handmade cards, accompanied by my photos and written meanderings which are occasionally witty, often tongue-in-cheek, and rarely profound. Beginning in June 2013, you'll also see lots of NBUS, which is an acronym I coined for Never-Before-Used-Schtuff. Note: my Privacy Policy can be found at a tab below and you can find my NBUS Challenge online. I hope you'll join in the fun there! Thanks for coming by! Have a beverage and enjoy!

March 28, 2023

Dry-Embossed Gilding Flakes

Hello Stamplings!

I hope you had a great weekend as March is rapidly winding down!

I'm here for my monthly Group of Seven Cardmakers post. At our crafty Zoom session earlier this month, we played with gilding flakes, embossing folders, and Stazon ink. I have lots to share ...

This technique involves covering a surface with double-sided tape (or some other adherable product) and applying the gilding flakes. I used a Scrapbook.com double-sided 8.5 x 11 adhesive sheet and covered most of it with the gilding flakes. That gave me enough coverage to cut a full card front panel and two other partial panels to make the cards shown below ~ and to still have some left over for more cards. After burnishing the flakes and dry-embossing, you lightly run your Stazon ink pad over the panel. 

A. Onefer
I used Cosmic Shimmer Warm Sunrise gilding flakes. This was my first time using gilding flakes because I'm normally more of a clean and simple card maker who already has a lot of other products, if you know what I mean. But that's the nice thing about getting to know and play with these other talented card artists who enjoy a different style of design. It stretches my creativity.

Everyone warned me to be very careful, even just opening the jar, so first I put Hammy in his play space in the Big House. (Enough said about the hamster havoc that would have happened if I hadn't!) I was very careful opening the jar and then I took out a small amount of flakes and put them in a bigger plastic container to minimize the wafting and whirling.

All went well, but just as I was nearly finished covering the large card front panel with the pieces of gilding flakes, my defibrillator went off! I'm okay, it was just a two-hour interruption going to the ER. No, stop it, I'm just kidding, but when people tell you not to breathe while working with gilding flakes, they don't mean it literally. (💡A great use for left-over Covid masks!😷) 

B. Twofer
For this card, only the center panel is gilded, embossed, and inked. For the card base, I used the same e/f to emboss a piece of copper cardstock. Then I embossed a piece of black cardstock using the same e/f and die-cut the frame so everything is matchy-matchy.

I noticed that my black Stazon pad was juicy, so my finished gilded panel was somewhat sticky. So, just for fun, I flipped it over onto a piece of white cardstock to see if I could make a monoprint and it worked! It did take a lot of the black off my gilded panel, but I like the brighter, less moody, result. Here is the bonus card I made for my stash using the monoprint:
C. Threefer
Because the Stazon pad was a bit juicy, I decided to try Archival plum ink for the above gilded flake strip. I like the color a lot, but it, too, left a sticky residue, so I did another monoprint and made this CAS card:
Note: After I finished my cards, I was concerned about how I would be able to send them, sticky, in the mail. I could get them into an envelope, but how would the recipient get them out without damage because the sticky bits would stick to the envelope? So I messed around and found that if I stuck more of the gilding flakes over the sticky bits, the sticky bits went away! Hala Luya! 

I ended up really loving the gilding flakes! If I took my time and was careful, it wasn't as messy as I envisioned. I'm not sure if I will add the ink over the embossing in the future, but I certainly will make more cards using the flakes alone or by using the flakes and then dry-embossing.

On the Group of Seven Cardmakers website you will find the technique details, video links, and the fabulous results from the other ladies! I hope you'll give this technique a try and link your results in the gallery. We'd love to see how well it worked for you! 

Challenges

Card B: Rudolf Days (A/G Christmas); ABC Christmas (G is for Gold).
Card C: Just Us Girls (CAS); Krafty Chicks (All Occasions).

~~~

Enjoy your day! No, seriously, enjoy! LITS!*

As always, thank you for coming by to visit the Playhouse and thank you for your condolences for my brother. Mwah!

*Life is too short!

March 24, 2023

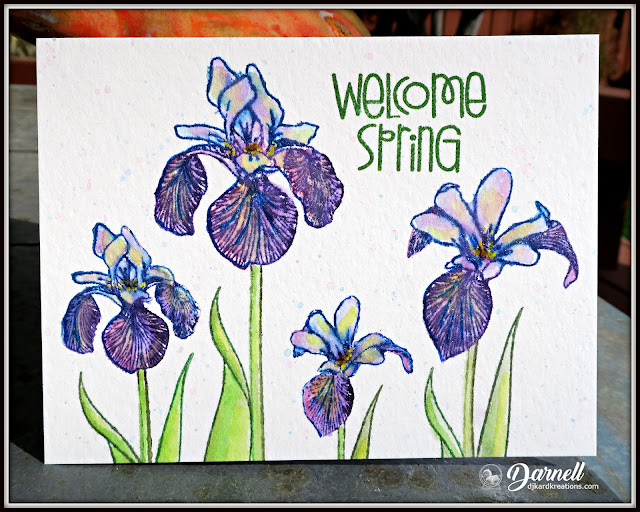
Welcome Spring!

Hello Stamplings,

How are you? I'm sorry I fell off the grid there for a minute. There's been a lot going on ... but like you, I try to squeeze in a bit of time for making cards when I can. 

Today I have a quick post and a quick card to celebrate the First Day of Spring. (Please keep your eyes focused on the calendar and not on what is happening outside your window.)
It's a shame you can't see how much this card glitters from Hammy's winking. This is a one-layer card (OLC) made by first inking direct to the stamps with markers, followed by a jeuzzing around with my Ziggies. The sediment is an old stamp that I think might be from Paper Smooches. Oh, and before he winked, you might be able to see that Hammy gave the background a very light pastel flickadoodledo.

I didn't have time to make a Twofer Christmas card, but I wanted to get this posted to welcome back Less Is More where the brief is OLC. It seems like they were on a verrrrry long break.

I'm also playing with:
~~~

Sadly ...

Last week, my baby brother passed away after a brief battle with cancer at the age of 66. We weren't close because of circumstances outside of our control and the fact that we lived on separate coasts, but we hit it off the few times we were able to get together. He was a really good guy and his family and friends will miss him a lot. There were seven of us siblings and it is upside down that the youngest went first.😢

I know many of you have also lost loved ones recently and three of my bloggie friends have died in the last six months. It takes a toll.💔

🌬Also last week, we were finally impacted by the storms that have been rolling through California one after the other for weeks. The fierce winds took out two small trees and the whole length of our backyard fence. It's going to be a while before the fence can be repaired. Lots of other folks have lost trees and fences throughout our area and beyond, so the fence contractors are quite busy. My heart aches for the sweet birds, including "my" hummingbirds who lived in those trees.😢

Well, that's too much sadness for this blog! I don't want you leaving here sad, so how about a hamster butt to cheer you up? You can't look at that butt and not smile!

I hope you take care and don't forget to e
njoy your day! No, seriously, enjoy! As I always say, LITS*.

Mwah!
*Life is too short!

March 12, 2023

Spring and Winter Party of Twofer ...

... your table is ready.

Hello Stamplings!

How are you? In America we all moved our clocks ahead one hour before we went to bed last night. Apparently there is an army of tiny trolls who come into our homes in the night, collect the hours, and then keep them in a secret place until fall arrives and then they reverse the process and give us our hours back. 

I think there should be exceptions or exemptions or exclusions. Like if you've reached retirement age, you get to keep your hour. The last thing I need in a day is less time! 

So Justin Case you need help waking up or staying awake today, I made you this:
Can I just say up front that the gold paper I used for the wooden die-cut frame (from Hero Arts) does not look holographic until it gets in the sunlight. It's rather magical, but I'm entering a gold and green color challenge with it and, honest, I didn't use rainbow paper! And the top bud is celery green, not yeller. 

While we've been having endless rain, I've been die-cutting endless little croci bits from my NBUS BontaniCuts Crocus from The Greetery and gluing the bits into little flowers. These two were made in just green shades for the above-said challenge because I have my artistic license. You'll be seeing the others dressed in color on a future blogcast. The schparkly gold background panel, gold heat-embossed sediment, and die-cut frame were all in my Stasherooni.

Challenges
Twofer
Hammy and I pulled out all the stops for this one. The background snow was created using transparent gloss paste through the Tiny Dots stencil from Memory Box. Then (after I placed a snowy hill mask in place) Hammy used his new blending shoes to create the blue sky. 

On watercolor paper I stamped and clear heat-embossed the NBUS scarf-wrapped cat from Stampers Anonymous "Snarky Christmas." I painted him with my Ziggies and fussy-cut him. I was really tempted to just cut off his teeny-weeny arms and legs, but after fortification with a bit of potato liquor, I forged ahead. 

I then popped him up on foam lifters and added googly eyes and the sediment. It still seemed to need something to keep the focus on the cat (duly winked by Hammy), so I added the frame. I also gave his feet a shadow in the snow, but the sunlight washed them out.

Here is a closeup of the glazed snow and winked cat:
Challenges
~~~

You haven't had a Nellie fix in a while:
Like today's Christmas cat, Nellie likes to be swaddled, but sometimes her blankie gets askew and it's too dang cute. Don't ask me how many photos we have like this. You just have to take one look at her face to know it's been too many as far as she's concerned.

~~~

Enjoy your day! No, seriously, enjoy! LITS!*

As always, thank you for coming by to visit the Playhouse and special thanks to you if you take the time to join as a follower! Please let me know you came by so I can be sure and return the flavor!

Many of you have asked how we are faring with the storms and flooding that have hit California. We are fine, but it's really bad in some areas, with more to come.🙏

If I'm not back before the end of the week, have a Happy St. Patrick's Day!

*Life is too short!

To open the pop-up comment box that let's you jump to the end w/o scrollingClick CTL + Home. Click the Home tab under my blog banner which resets the post. Click Page Down to reach the end of the post. Click Comments and a pop-up box opens. Click "Jump to Comment Form" and wallah, no more car pool tunnel! Mwah! (p.s. If you ask me a question in your comment, please remember to leave me your email address so I can respond. Thank you!)

March 6, 2023

Two Lips and a Holly

Hello Stamplings!

How's it going? Did you have a good week? I hope you enjoyed some crafty time!

My crafty time was inspired by the little pink flowers that come to life every year in the garden. It's a welcome sight and to celebrate, I broke out my NBUS Hero Arts "Floral Tulips" stamp and die set.

Onefer
This is a CASE of a card I received (cough) years ago from my friend Lisa Tilson (My Card Trip). I'm sorry I can't direct you to her blog ATM; not sure the reason. I'm proud of myself for finally CASEing her beautiful card. After blending and schplattering, the tulips were stamped and clear heat-embossed before coloring with my Ziggies. The sediment is from a Penny Black set by the same name.

Challenges


***

You might remember that Hammy wanted to try a bit of blending so I asked our local cobbler to make him special shoes. It turns out not to be possible because of his weak ankles (Hammy, not the cobbler), but I think I've come up with a workable solution. 🠊

It turns out my little triangle-shaped foam blenders fit him perfikly! There will be ink and schplatters up and down the Playhouse now, but I don't mind. It's better than having him bored. When he's bored, he waits until I am deeply engrossed in some fine detail work and then he either leaps onto my head or runs up my pant leg. The obituary writes itself ... E
lderly woman found . . . 

Twofer
For today's Christmas card, I returned to my fave faux watercoloring technique of direct-to stamp coloring and spritzing of this favorite Penny Black holly.

Challenges


~~~

Enjoy your day! No, seriously, enjoy! LITS!*

As always, thank you for coming by to visit the Playhouse and special thanks to you if you take the time to join as a follower! Please let me know you came by so I can be sure and return the flavor!
*Life is too short!

To open the pop-up comment box that let's you jump to the end w/o scrollingClick CTL + Home. Click the Home tab under my blog banner which resets the post. Click Page Down to reach the end of the post. Click Comments and a pop-up box opens. Click "Jump to Comment Form" and wallah, no more car pool tunnel! Mwah! (p.s. If you ask me a question in your comment, please remember to leave me your email address so I can respond. Thank you!)