A site for my handmade cards, accompanied by my photos and written meanderings which are occasionally witty, often tongue-in-cheek, and rarely profound. Beginning in June 2013, you'll also see lots of NBUS, which is an acronym I coined for Never-Before-Used-Schtuff. Note: my Privacy Policy can be found at a tab below and you can find my NBUS Challenge online. I hope you'll join in the fun there! Thanks for coming by! Have a beverage and enjoy!

Showing posts with label Retro Rubber. Show all posts

May 28, 2023

Ink Blending on Colored Card

Hello Stamplings!

How are you? Are you keeping up with your new year's resolutions now that we are about to enter the middle of the year? Oh. Sorry. Touchy subject? Not just me then? Well, never mind. Intentions are the most important thing, said no one ever, but we're all in the same boat, said everyone at some point.

Today's post is all about this month's crafty Zoom session for the Group of Seven Cardmakers! As the title indicates, we did some really cool ink blending on colored card panels. You can find detailed instructions and a video on the Group of Seven blog.

A Duofer
You can use either solid or outline stamps to heat-emboss, but I preferred the outline stamps. I gold heat-embossed the leaf stamp from the Memory Box "Harvest Love" set. Using the video instructions, I then ink-blended the corners and sides of the panel to draw the eye into the middle. If you like, you can add black ink over that, concentrating on the edges, for even more contrast. 

Hammy schplattered gold and white ink over everything the panel and I added the PTI gold-embossed sediment.

Challenges
~~~
This technique was so easy and effective, I actually made several cards in jewel tones, using different outline images. I'm sharing the above because I liked the effect of the blending on the green. The outline image used here was Altenew's "Leaf Canopy."

Challenges
Threefer
And in case you're wondering if the technique works for Christmas card designs, here's your answer! I love the festive look, especially using classic berry red and pine green card bases. The pine cone used here is from Simon's set, "The Magic of Christmas."

Challenges
I hope you'll give this technique a try and link your card over on the Group of Seven Cardmakers blog to show us what you make!
~~~

Enjoy your day! No, seriously, enjoy! LITS!*

As always, thank you for coming by to visit the Playhouse and special thanks to you if you take the time to join as a follower!

I
t's okay, Hammy. Come out and show the people how pretty you look all covered in gold and white schplatters!

Mwah!
*Life is too short!

April 1, 2023

Guest Designing With the Snarky Sisters!

Hello Stamplings!

Happy April Fool's Day! This is one of my favorite holidays because I catch The Mister up every single year with some silly lie. 

Sadly, this year my streak is over because yesterday he put his back out really badly. No kidding. Poor guy. I keep telling him a person with a bad back shouldn't put his underpants on by hopping around on one leg at a time. Sooner or later, you know, that foot is going to miss the hole. Pray for me him. Thank you.

My card today is meant to inspire you to play in a very fun challenge in Blogland called Sisterhood of Snarky Stampers! I was fortunate to win recently and I now have the honor of being their Guest Designer! No, it's true. It's not April Foolery. 

The challenge brief is a very timely, "B is for Bunny!" I knew immediately which bunny in my cupboard would be featured!
I laid out my stamps on scratch paper to see whether the drink would fit with the bunny and, goodness, that's a sentence you don't see every day. Even before I had my wodka, I took way too long to figure out whether I should mask the leg of the bunny or the stem of the glass. ❓ Hammy, as always, to the rescue. I'm so lucky he never ages, because my own brain cells are dying off like calculators and checkbooks.

But I digest. On the card front I used a NBUS line stencil from Honey Bee Stamps to lightly blend gray lines. You know that inebriated bunny is going to need something to lean against. A wall "ground," if you will. 

Then I stamped the bunny and then the birthday present martini. Or was it the other way around? Masking is fun. And it gave me a one-layer card, so that's a bonus for mailing!

Then I colored the images, added the appropopo sediment from MFT, and Hammy went to town with his winker. Oh, and then I used a lime green marker and a T-square ruler to add a border around the card front so your eyes don't fall off the edge. That would not be good.
That badge is a hoot and a half! I hope you will check out this fun challenge and play along! Snark is not required (but always appreciated), so no worries if you don't feel like making your bunny snarky ~  all bunny designs are welcome!

Other Challenges
  • Retro Rubber: Happy Birthday! My bunny stamp is over 20 years old, one of the first stamps I purchased. It's from an OOB company called Mostly Animals. The martini and sediment are over a year old, also, but I'm not sure how old they are.
  • Seize the Birthday: Anything Goes option.
  • SSS Wednesday: Anything Goes.
Twofer

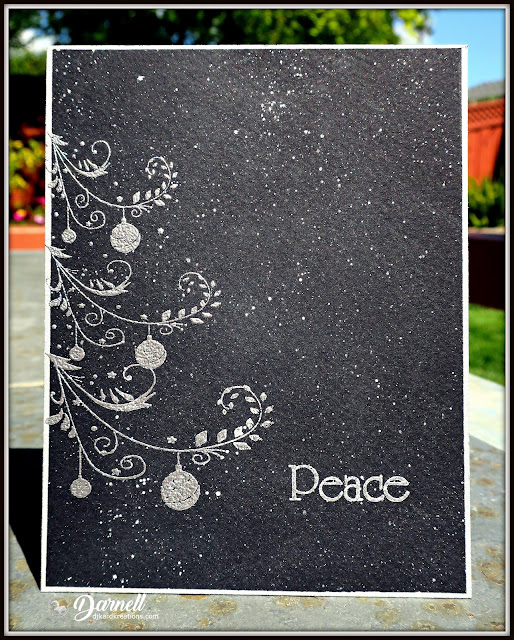
In honor of World One-Layer Card Week (WOLCW), I also have a QACAS OLC Christmas card to share:
April Fool's! It's not really World One-Layer Card Week. (But tomorrow really is National Peanut Butter and Jelly Day!) The tree is an old unmarked red rubber stamp that you've seen before. This time I dressed it in silver tinsel and silver ornaments. I added a simple silver sediment and Hammy went to town with his silver schplatter. 

I did a great job making the sky a kind of cloudy milky-way galaxy effect, didn't I? April Fool's! It's a black card and I just forgot to wipe off the excess embossing buddy powder!👵Once again I used a marker to make a faux border, this time in silver. I used to do that trick years ago and I have rediscovered how much it adds to a design, especially a one-layer design.

Challenges
~~~

Enjoy your day! No, seriously, enjoy! LITS!*

As always, thank you for coming by to visit the Playhouse and special thanks to you if you take the time to join as a follower! Please let me know you came by so I can be sure and return the flavor!

*Life is too short!

To open the pop-up comment box that let's you jump to the end w/o scrollingClick CTL + Home. Click the Home tab under my blog banner which resets the post. Click Page Down to reach the end of the post. Click Comments and a pop-up box opens. Click "Jump to Comment Form" and wallah, no more car pool tunnel! Mwah! (p.s. If you ask me a question in your comment, please remember to leave me your email address so I can respond. Thank you!)

June 1, 2022

NBUS Flower and CAS Mix Up Guest Designer

Hello Stamplings!

I hope you are doing well as we start this first day of June! Of note, today is National Pen Pal day! (You see what I did there?) Thanks to this wonderful blogging community of cardmakers, I'd like to thank all of the 200+ amazing pen pals friends who exchange awesome handmade cards with me!

The sales were insanely tempting this past weekend. Did you cave in? It was hard to resist and if you didn't resist, I hope you got everything you wanted!  

Due to a win in Febrooary, this month it is my pleasure to be the Guest Designer for CAS Mix Up!! CAS Mix Up has been on hiatus and it is wonderful to have the challenge open again! CAS Mix Up has a rotation of themes and for June the theme is "Stencils." In addition to a theme, there is a prompt for you to follow and the prompt for June is "Pastes/Gels." 

Here is my card to inspire you:
I have to tell you that when Jenny told me the theme was "stencils," I was glad because I purchased quite a few of them over the last coupla years and I even made up cool binders for them ... and then I pretty much ignored them. This was just the kick in the pants I needed to stencil again.

But then when she went on to tell me I needed to use a stencil AND embossing paste or gel, I literally gulped. Just like they do in novels.

Now what do I do? Embossing pastes and gels are another thing I got into for five minutes five years ago and then pretty much ignored. But, okay. I can do this. They wouldn't call it a challenge if it weren't challenging. And you know what? I ended up having the best time making my card. Forgive me for tooting my own honker, but I love how it turned out!

What happened first was, I blended CP Aquatini onto a white card through the NBUS round flower stencil from Funky Fossil.
Next, I applied the gel medium through the stencil. I hope you can see in some of the photos the wonderful silky "feel" that happens when the gel hardens. It is translucent, so the pretty aqua color remained.
Next I used a Poppystamps Pointed Rectangle Die to cut a frame to go around the circle. Because this is a CAS challenge, the card design needs to be clean and simple. That means lots of white space, so I cut the circle in half and made two cards. (I temporarily taped the circle back together on the back in order to take the photos for this post.)

So I held my half-circle up this way and that on my card and I finally decided to use it as a faux flap on a colored card panel. I know, I'm with you on wishing it opened up as a tri-fold, but it never even occurred to me until I saw it finished. To bring the eye in and make the design consistent, I added a matching pierced frame as a border. 

Now. What to do about a sediment? I was looking through my various word dies, when my little hamster helper challenged me to add another stencil element to really inspire everyone! Well, that was a cracklin good idea, but I don't have any word stencils ...
... so I just made one using a Hugs die from MFT! Shazambam! I used Dreamweaver Pearlescent Embossing Paste through the homemade stencil and it really worked a shiny treat. 
It's an honor to join the extremely talented group of designers at CAS Mix Up for June and I encourage you to check out their cards for lots of great design ideas ~ then get your stencil groove on using embossing paste or gel and join the gallery! If I can do it, you can do it, and I can't wait to see what you make!

Twofer
Real quick, here is another card that I made a while ago for a dear friend. I love this little mum-like stencil flower, but it's unmarked so I can't help you there. I do wish all stencil manufacturers would etch their names on their stencils. I used Gina K. Glitter Gel mixed with some Opal Magic (pink-blue) acrylic paint. The amazing sediment is from "Unforgettable" by WPlus9. Here's a closeup of the schparkle:
Challenges
~~~

Enjoy your day! No, seriously, enjoy! LITS!*

I'm excited that I'm going to be seeing some crafty friends over the next few days and, after that, enjoying some non-crafty time with another dear longtime friend! Pray for us that Covid leaves us alone to have some long-awaited time together. Mwah!

*Life is too short!

To open the pop-up comment box that let's you jump to the end w/o scrollingClick CTL + Home. Click the Home tab under my blog banner which resets the post. Click Page Down to reach the end of the post. Click Comments and a pop-up box opens. Click "Jump to Comment Form" and wallah, no more car pool tunnel! Mwah! (p.s. If you ask me a question in your comment, please remember to leave me your email address so I can respond. Thank you!)

June 10, 2021

Sunshine Came Softly . . .

Hello Stamplings!

I had a tough time choosing a sunshine song lyric to start my post. I googled it and was amazed how many songs there are about sunshine. But that's a good thing, right? 

It's already the 10th and that means time for the next Twofer Card Challenge! June is a wonderful time to choose ðŸŒžSUNSHINE!🌞 as the prompt and here are my two cards to inspire you.
The sun die I chose as my prompt product is from Lil' Inkers. As you can see, I gave myself an extra personal challenge to see if I could also incorporate that awesome lighthouse die from Memory Box into both my designs. The lighthouse die came out in 2013 and the stitched sun dies are prolly the same vintage and I still love using them. 

Onefer
This card design is all about die cuts and Hammy even used an old circle punch for the small suns to give them more girth around the middle. I thought as long as I was using some old-timey products, I would use some old-timey speech. Because when was the last time (only time?) you've used girth in a sentence? Maybe it will come back into favor because of Covid and how we all added to our girth as a means of self-soothing during the long isolation.

But I digest. The background is a piece of pp. The white slated die panel (Watercolor Stripes Cover Die from Altenew) was a gift from my friend Betty. I used pp for the large sun and for the lighthouse and there were yellow vellum stitched suns used as well. The vertical birthday sediment is from Stamps by Judith.

Challenges
Twofer
The beautiful blue foil you see was actually the spark of both of my sunshine designs. The color just screams ocean and if you look closely, you can see there is a water bubble pattern in it, so everything took off from there. The e/f is called Branches, but I think the lines also look like waves, and the sediment is from Paper Smooches. Hammy added some glossification to the middle of the sun.

Challenges
The Deets
You can use either a SUN or SUNRAYS.
I am looking forward to seeing your sunny designs! We are fortunate to have Veana and Daphne as our Guest Designers this month. Their sunny designs, and those of the talented Team, will be sure to inspire you over at the Twofer Card Challenge!

~~~

Fun With Letters

My sister Diana shared this fun brain teaser with me quite a while ago and I finally remembered to share it with you.

What's a nine-letter word you can turn into eight other words by simply removing one letter at a time?

STARTING
Remove the T = Staring
Remove the A = String
Remove the R = Sting
Remove the T = Sing
Remove the G = Sin
Remove the S = In
Remove the N = I

Of course, I had to take it one step further by starting to turn it into a story. It happened because I found myself staring out the garden window at a string that was out of place next to the butterfly bush. I stared at it for so long my eyes began to sting. As I sat there blinking to moisten them, I overheard my neighbor (the one with the collie who jumps on the fence) sing a song to her small daughter about the wages of sin. How odd, I thought, but I don't try to judge others too harshly when I'm in the process of eavesdropping. Wait. What? Eavesdropping? Not I.

I hope you have fun with your friends and family with this little brain teaser and enjoy your day! No, seriously, enjoy, and stay safe! LITS!*

As always, thank you for coming by to visit the Playhouse and special thanks to you if you take the time to join as a follower! Please let me know you came by so I can be sure and return the flavor!

*Life is too short!

To open the pop-up comment box that let's you jump to the end w/o scrollingClick CTL + Home. Click the Home tab under my blog banner which resets the post. Click Page Down to reach the end of the post. Click Comments and a pop-up box opens. Click "Jump to Comment Form" and wallah, no more car pool tunnel! Mwah! (p.s. If you ask me a question in your comment, please remember to leave me your email address so I can respond. Thank you!)

April 6, 2021

Your Special Day and Christmas Rainbows!

Hello Stamplings!

I hope you all enjoyed a lovely Easter weekend, although by the time I get this posted, it will no doubt be mid-week. That seems to be my new normal now as I start something and then a warm breeze blows through my meager thoughts, scattering them like moths under the street lamp. Then I'm off to gather them up, or head off in an entirely new direction! 

Eventually I wend my way back to creating and sharing. It may take me longer, but I get there in the end and here are my latest makes.

Onefer
Most of you will prolly remember this stamp from the cute Penny Black set called "critter celebration." It was very popular, just as the fabulous Anita Jeram stamps are now, and eventually I succumbed to buying the set. And then it sat because by that time I thought the interwebs had been saturated with the sweet critters. Now, with Hammy gone, I went looking for another critter to play with so this NBUS set is finally getting some love.

Using some pretty pp from SU, I paper-pieced the flower, stem, and mouse. I think I've mentioned before that paper-piecing is one of my all-time favorite techniques. I think it's because it reminds me of playing with paper dolls. I remember having lots of fun making more clothes out of magazine pictures. The sediment might also be from Penny Black. Some matching mouse-colored schplattering and a wee butterfly finished the scene.

Challenges
Twofer
This is thinking outside the Christmas box of decorations, isn't it? It's like bleu cheese. You're either gonna like it or you're gonna hate it. Either way, this was a fun and QACAS OLC design that took only minutes to make. I used the "poinsettia row" stamp from STAMPlorations, colored with markers and spritzed. Hammy would love winking all those colors, so I left them for him to do when he gets back. (They are on the move again, so that's good!)

Challenges
~~~

A First

Normally, I put the laundry away right after folding, but the other day, I left it for a few minutes and when I came back into the room and glanced at the basket, I cocked my head to the side wondering when we acquired a sheep-skin rug.
Wait. What?
It was just the little diva, Nellie! You will notice that she, too, needs to be laundered and thankfully she sees the groomer tomorrow! 

~~~

Enjoy your day! No, seriously, enjoy! LITS!* Keep safe!

As always, thank you for coming by to visit the Playhouse, especially since I've been slow with my return visits, and special thanks to you if you take the time to join as a follower! See on Saturday with April's Twofer Challenge!

*Life is too short!

To open the pop-up comment box that let's you jump to the end w/o scrollingClick CTL + Home. Click the Home tab under my blog banner which resets the post. Click Page Down to reach the end of the post. Click Comments and a pop-up box opens. Click "Jump to Comment Form" and wallah, no more car pool tunnel! Mwah! (p.s. If you ask me a question in your comment, please remember to leave me your email address so I can respond. Thank you!)